The Search for a Gradient Mapper Material
I've been looking for a gradient mapper node in the Unreal Material editor for awhile. Something I could use to easily remap colors to a greyscale image, so I can quickly set up lots of material instance variations on the fly in engine. I haven't had any luck finding one and had kind of given up on it, until our tech artist Ryan Lewis sent me this awesome article from Andrew Maximov on dropping albedo maps in favor of a greyscale texture with a gradient ramp. Then Ryan did some code magic to make a gradient mapper for work - which was great. That made me want one for home, and since I don't know code, I restarted my gradient mapper search. I found this post by Ryan James Smith about using your UV coordinates to pick between a series of gradient ramps that you've created in another program, such as Photoshop. This method is cool - but it still requires you go to an external program to create your gradients, and that makes tuning annoying because you have to jump back and forth between programs, tweaking bit by bit.
That got me thinking more and after a lot of scribbling and some simple math, I found a way to recreate a gradient mapper purely in the Unreal Material Editor!
So . . . how do you build a gradient mapper in Unreal's material editor?
Let's break it down - the first thing to keep in mind is a texture is really just a bunch of numbers between 0 and 1 (or 0 to 255 RGB, but in Unreal, we're working with 0 to 1 values, which makes the math a lot easier). Since it's just numbers that means you can apply any math equations to your image and it works just like regular math. You know the multiply blend mode in Photoshop? That's actually straight up multiplying the pixels (or the number value of the pixels) between two layers together. This simple idea opens up a world of possibilities for materials. So a texture is just numbers and you want to take a grayscale texture (aka a bunch of numbers between 0 and 1), and remap that grayscale image to a set of colors. You can do this by making your grayscale texture into an alpha for each color you specify. That way you can blend between the different colors using Linear Interpolate (Lerp) nodes and plugging in your adjusted grayscale texture as the alpha. How do you do that make your grayscale image a useful alpha? By changing where your grayscale texture is white and where it is black.
For each color you'll have to set:
1) the White Point of your alpha
2) the Black Point of your alpha
Set the White Point of your Alpha
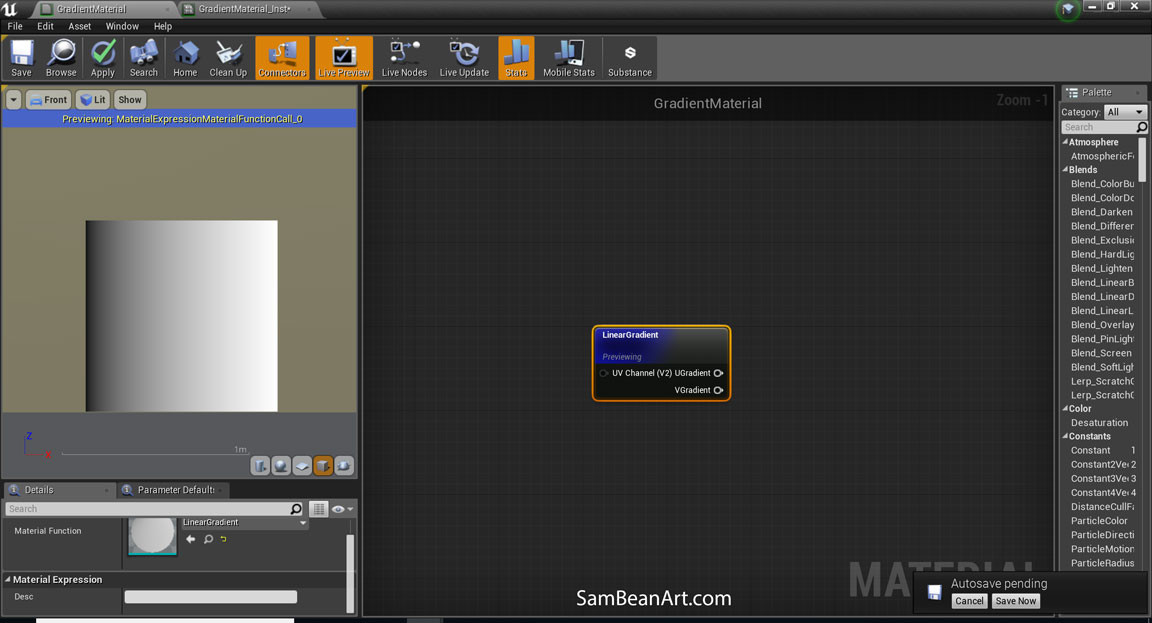
I'll be using a linear gradient node as my texture, in the end you can replace this with a grayscale texture and it works just the same.
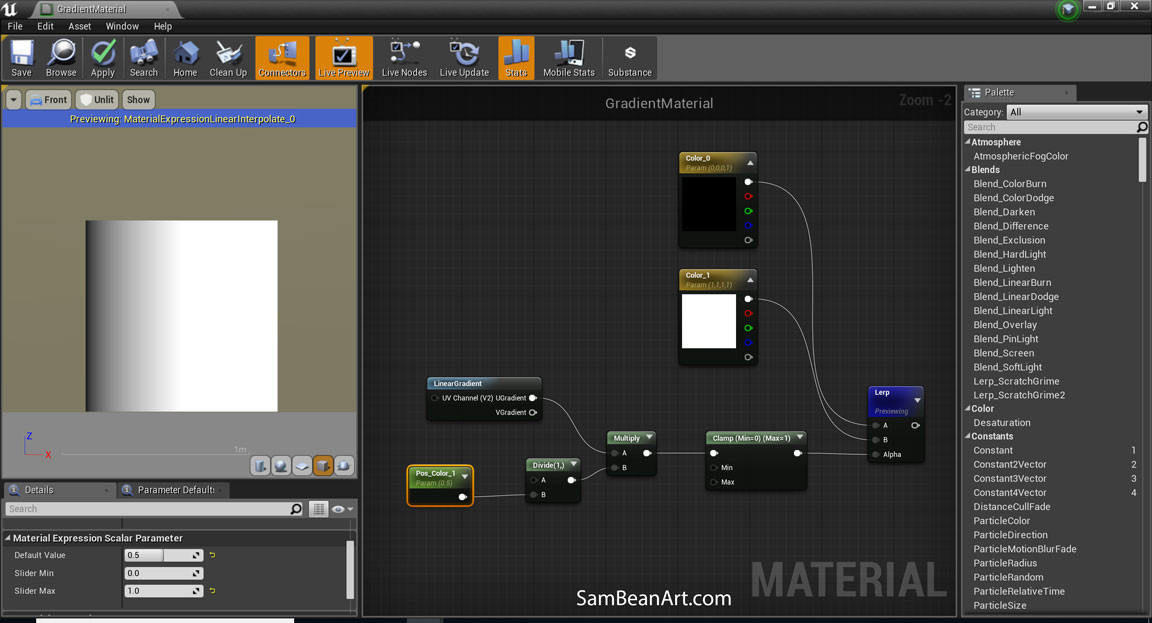
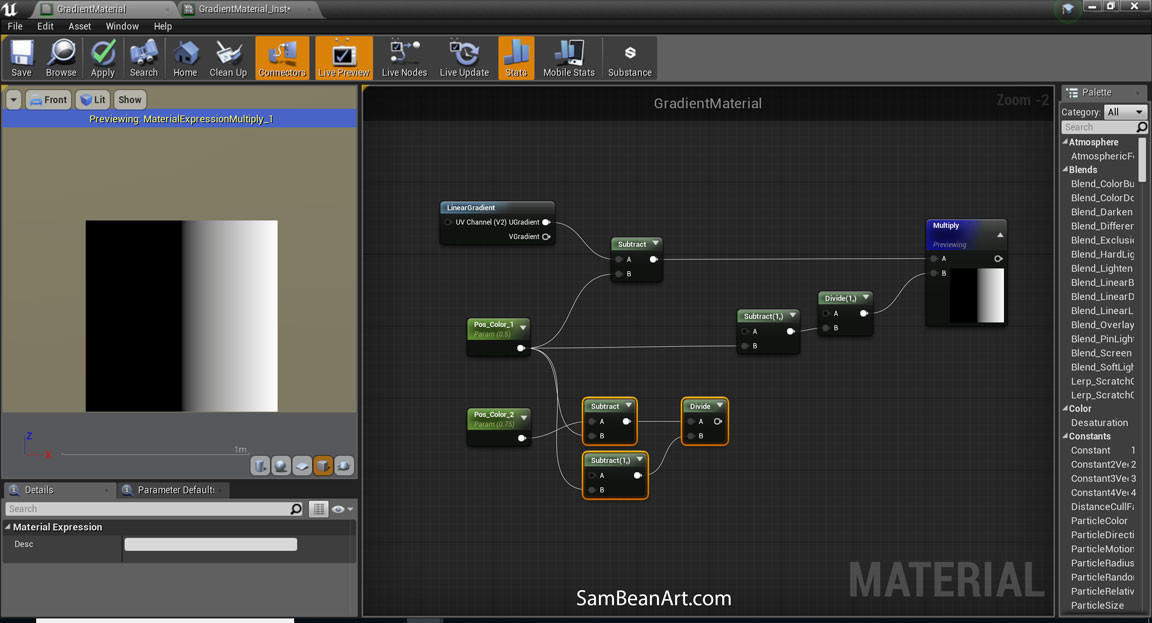
So here I have two vector parameters blending together based on the linear gradient. I want to adjust the position of the white point to some value between 0 and 1. The White point defines the position where Color_1 will reach full value (since this is the alpha we're controlling)

That means at whatever position I set the white point to, I need to multiply that value by some number to make it equal 1 at that position - to make that position my new White Point.
If White Point (WP aka Position of Color) = 0.25 -> 0.25 * x = 1, x = 1 / 0.25 SO to make my grayscale texture white (aka 1) at WP I just multiply my texture by 1 / WP
Pos_Color_1 = parameter for White Point of Color 1's alpha
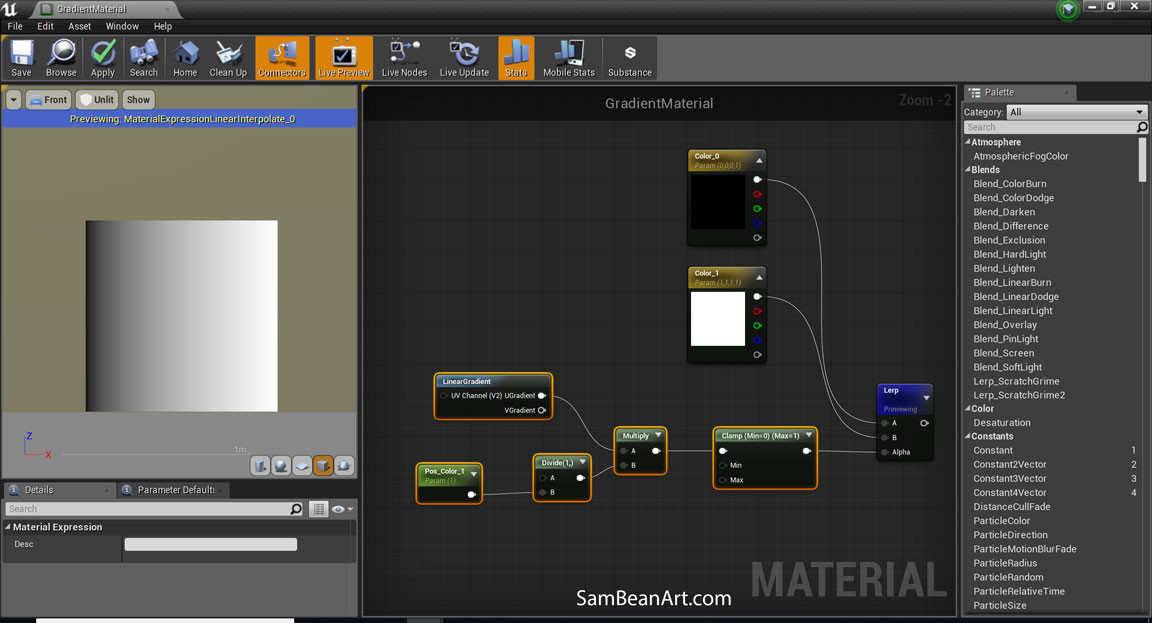
After multiplying, clamp the values so your alpha only goes from 0-1, otherwise you can get some crazy colors. In the image above Pos_Color_1 = 1, so nothing about your gradient changes. But if we change Pos_Color_1 to 0.5, you can see the affect to our alpha in action. See how now value 0.5 and up of your gradient has been remapped to a value of 1.
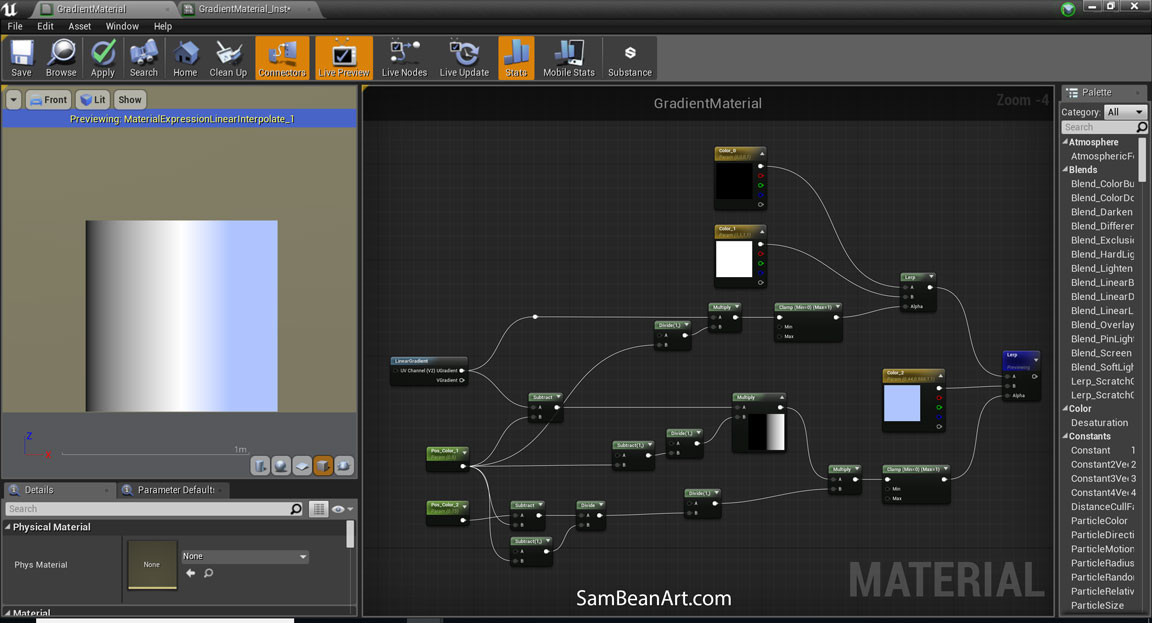
That takes care of the White Point. What about the Black Point?
If we add another color, then the alpha for that color will need any value less than the previous white point to be black, so that each new color only blends with the color next to it, not all other colors in your gradient map.
Lets look at our gradient again:
So if our previous Pos_Color was 0.5, then every value 0.5 and lower should be less than or equal to zero. How do we make every value below 0.5 <= 0? By subtracting 0.5. To keep this flexible - instead of subtracting a hard coded number - we take our grayscale texture and subtract the previous Pos_Color parameter from it.
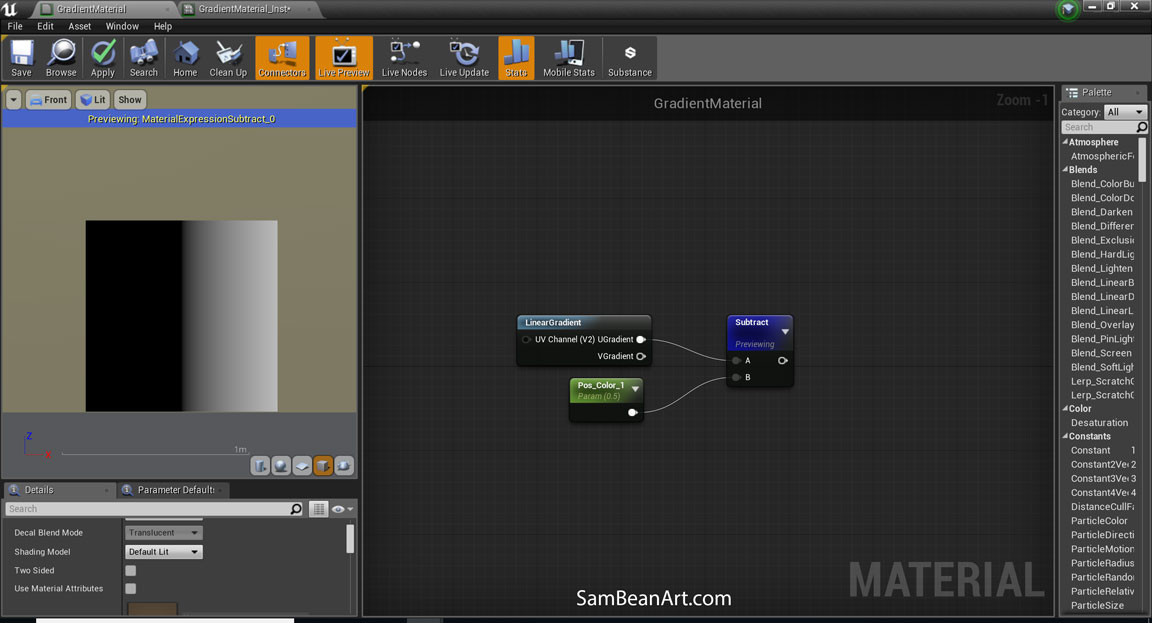
That makes everything at a value of 0.5 or below less than or equal to zero, but it also brings down all our other values, as you can see now the ramp only goes up to 0.5 instead of 1.

So we have to take our linear gradient and multiply by 1 / (1 - Pos_Color_1) to get our full gradient range back again.
Now we've set our second color's black point, we just have to set the white point. We add a new parameter to set the value of Pos_Color_2 at a value between 0 and 1. We have to do some math to convert this value from a percentage of 0-1 to a percentage of the new black to white range defined by our first color (in this image 0.5 - 1).
Then we do the same math we did for the first color to define the white point - take our new gradient from Pos_Color_1 to 1, and multiply it by the inverse of Pos_Color_2.

And now you can string those two lerps together.
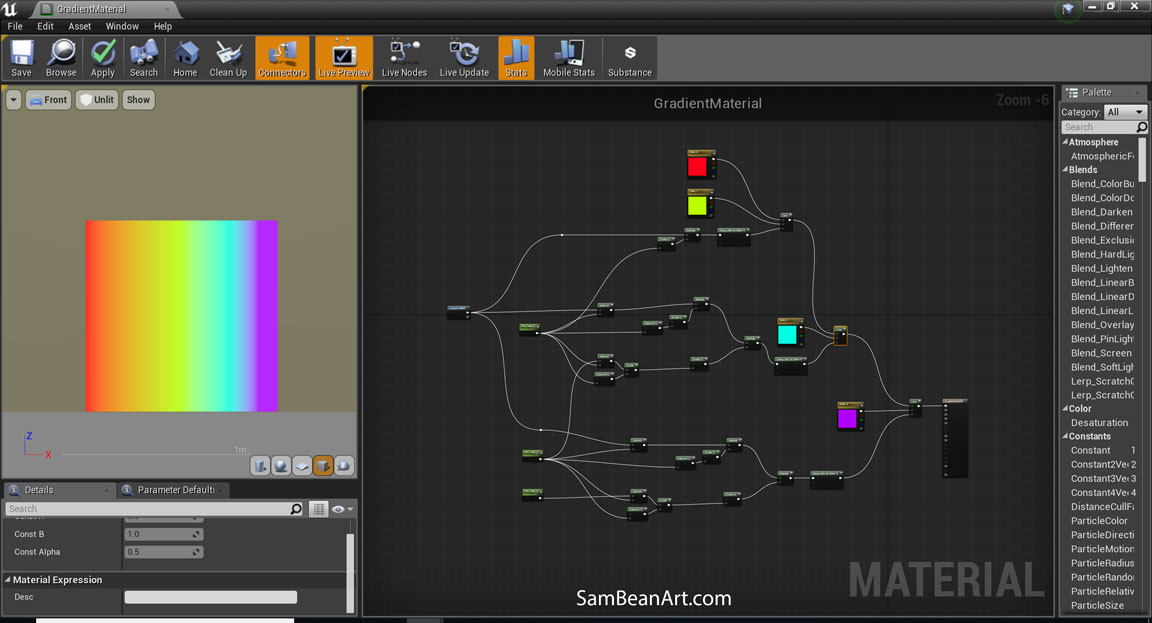
And use the same math to add more colors and color blend positions.
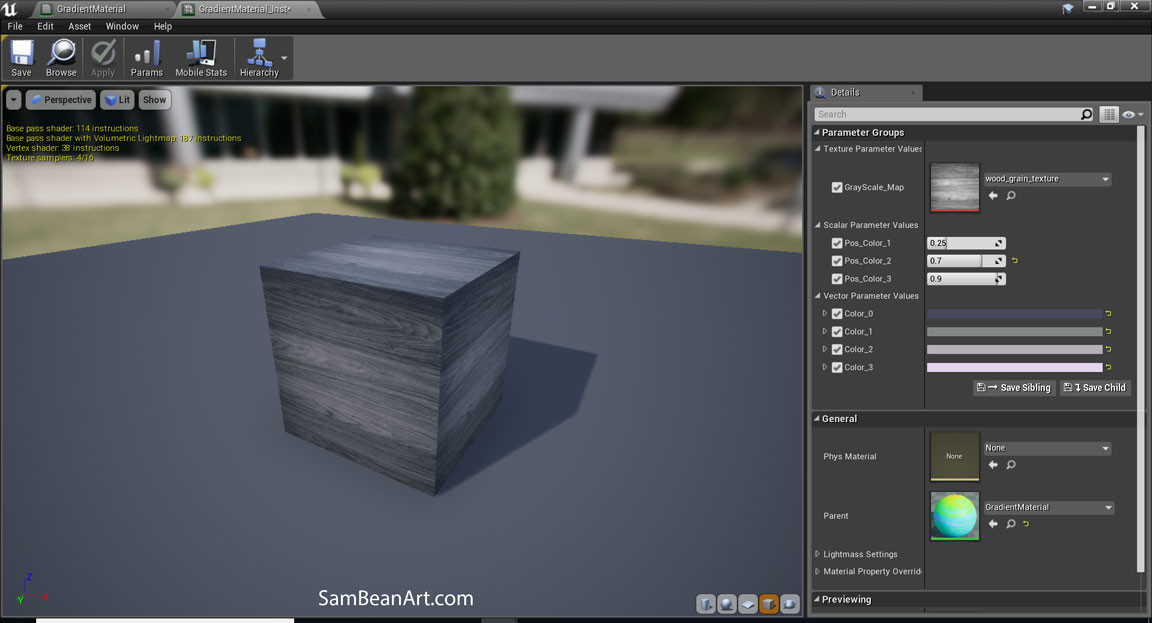
Then swap the gradient node for the channel of a texture parameter.. Here I'm using the red channel of a wood grain texture.
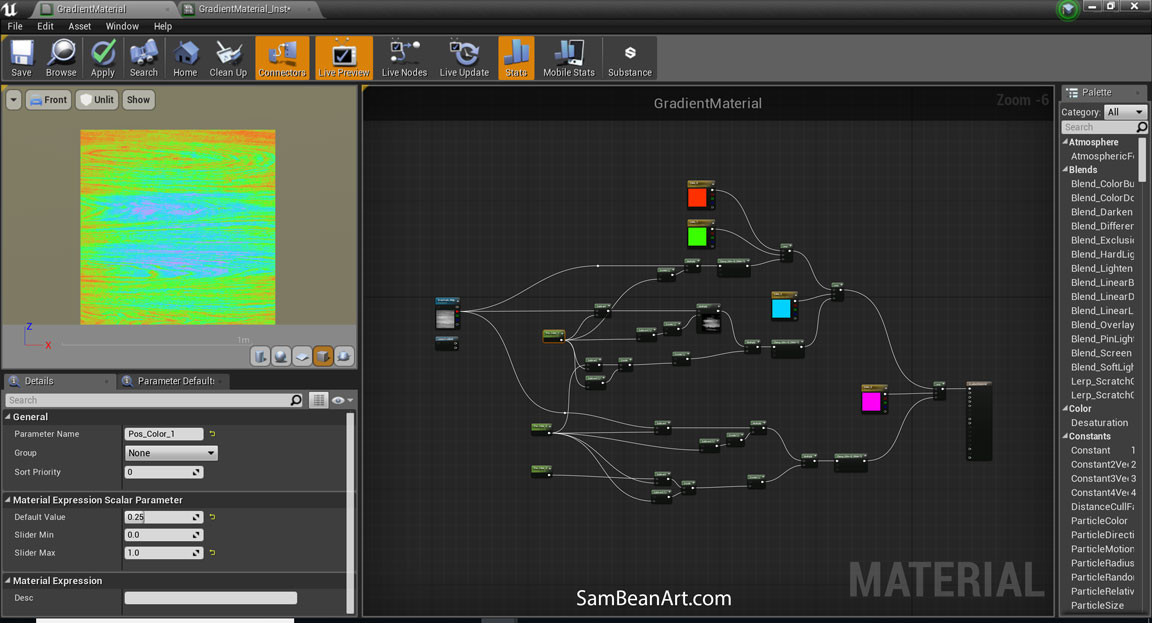
Now whenever you create a material instance, you can access all the parameters of your gradient mapper, to adjust the colors and blend positions.

And easily create texture variations in engine, without needing to make a series of gradient ramps in Photoshop, or needing to bake out individual textures from Substance. It may not be the most efficient, but it's certainly convenient! You could also use this workflow to create a levels node.
Thanks for reading!
And Thank you to Epic for building an engine that gives access to material parameters like this!
- Sam